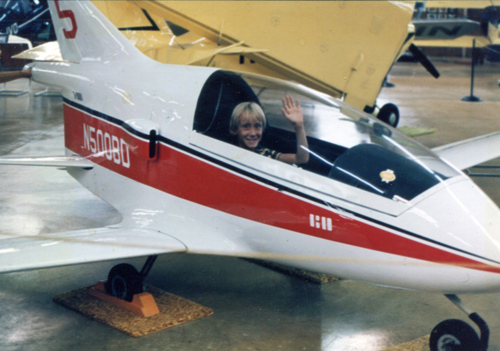
It clearly had some issues, but it certainly was a BD-5,
and I saw its potential. Rather than spend a lot of time examining and
pondering my purchase, I wanted to get it loaded and be on my way. I had a
long drive ahead. Since the
airplane's nosewheel axle was missing and one of the main tires was flat, we had to manually lift and shove the airplane up the truck's ramp and
tilt it to get it through the door. It was not an easy job for two people, but we got it
loaded and tied down within about a half hour. I wrapped the wings in
blankets for the long ride home.
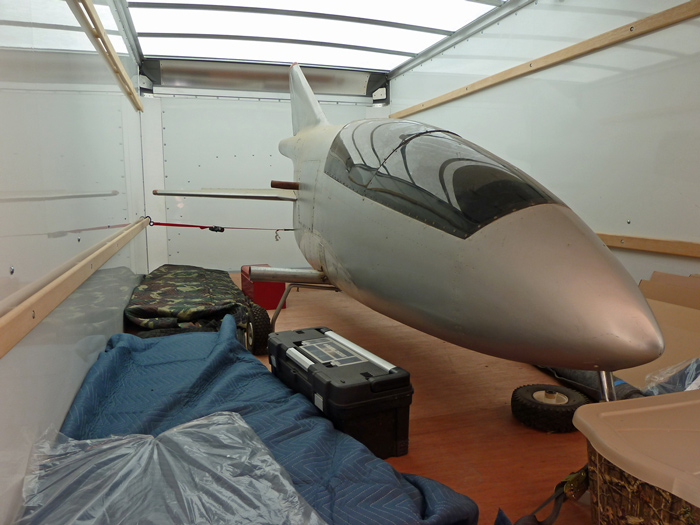
As you might be able to discern from looking at
those blankets, the airplane had a set of short "A"-wings rather than the
longer "B"-wings. This, along with some other issues I'd seen during my
brief look at it, suggested to me that this had never been a flyable
airplane. Les Berven, Bede Corp's chief test pilot, once said during his
evaluation of the early model BD-5s that "no one should fly the A-wings,
ever." So I was pretty certain that my new toy had always been a
display-only airplane. This was confirmed without a doubt after I got the
airplane home and began to go through it in detail.
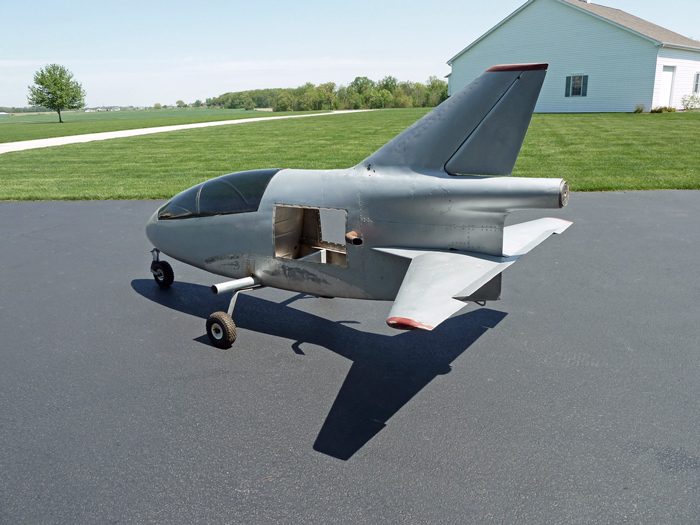
Some previous owner had made a good-faith
effort to make the airplane suitable for a parade float or other public
display. They had fabricated a set of fixed, spring-steel landing gear legs
that looked decent enough. These were attached to the bottom of the fuselage
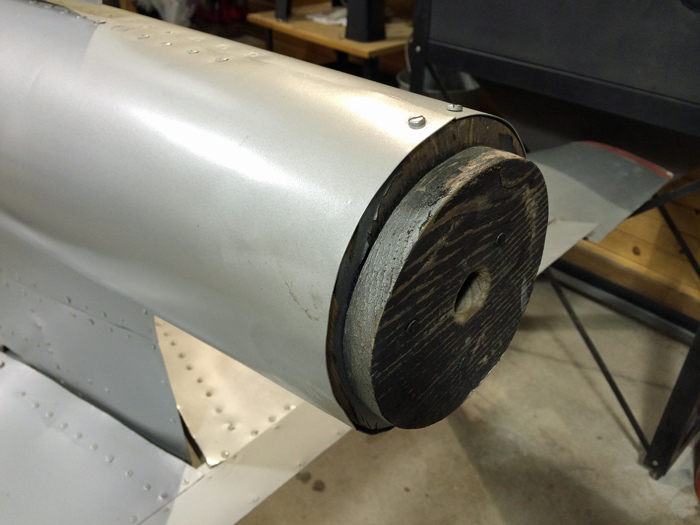
and tubular wing spars with carriage bolts. There was also a wooden insert in the prop-drive housing that
had once supported a dummy propeller attached to an iron pipe. The propeller
had been lost long ago:
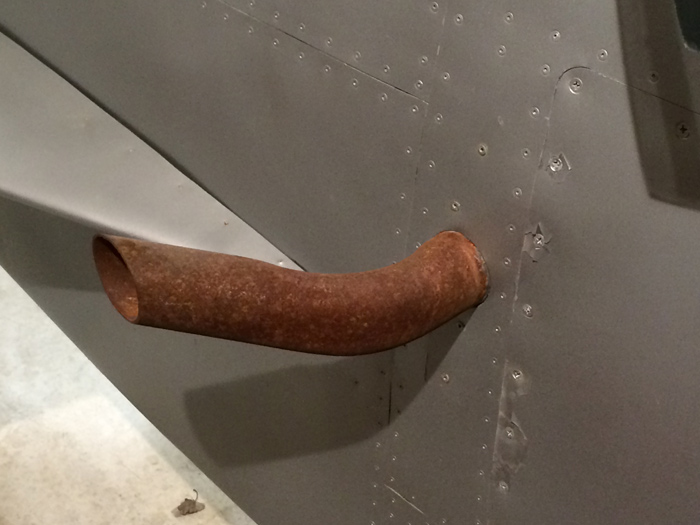
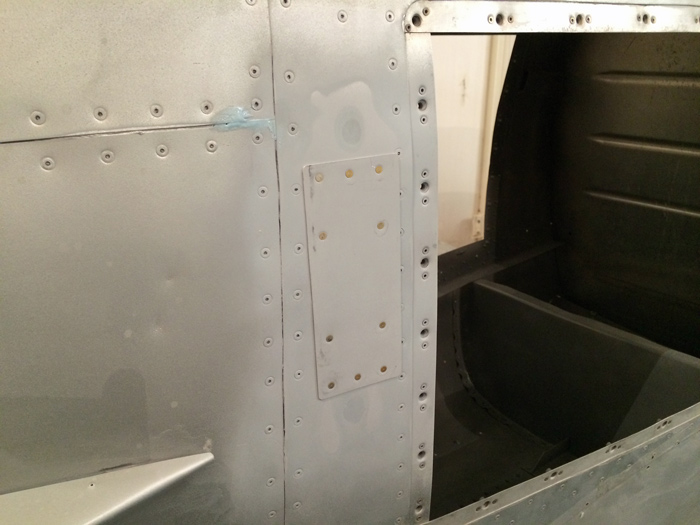
The fuselage sides were fitted with fake
exhaust pipes. These pipes were welded to steel plates, which were then
pop-riveted to the inside of the skin. It was a pretty good illusion, but
very crude:
I made a list of the big issues I would need to address before I even
contemplated displaying the BD-5 in public:
1. The engine bay and cockpit contained about 2 inches of dirt, leaves and
crud.
2. The canopy
support bars were badly twisted, and the canopy did not close all the way. The upper aft part of the canopy was
cracked and broken, with several large chunks of it missing.
The fuselage skin surrounding the canopy support channel was damaged. The leading
edge of the vertical stabilizer and the nearby fairing had also been damaged by the canopy.
3. There were several areas where the monocoque structure of the fuselage
was compromised by large strings of missing rivets, or blind rivets that had
been pulled without going through the underlying structure, but only the skin.
4. There were long strings of missing rivets on the horizontal stabilizer. I later learned that the
outboard 2 feet of the stab spar was missing
entirely.
5. There was a copious amount of automotive body filler everywhere, and it
had not been applied with much skill.
6. The wing fairings were in very poor condition.
7. The wheels and tires needed repair.
8. The paint was old, faded, and peeling off in many locations.
9. The fuselage skins and wing skins had numerous small dents and ripples.
I would also have to do some cosmetic restoration of the cockpit. It had
been fitted with a stock instrument panel, some old instruments, and a set of semi-realistic
controls, but everything was grimy and corroded. The flight controls were
not hooked up. In fact, someone had fixed the ailerons, rudder and elevator
into position with nails and pins. The carpet and homemade uphosltered seat were suffering from dry-rot and mold.
Over the course of two months, I took apart everything that could be taken
apart, and began cleaning, repairing, and priming. My goal in most
cases was to preserve, rather than doing a total rebuild of the structure.
First, I got the wheels and tires fixed so I could roll the
plane around the hangar. (The tires were knobby lawn-tractor deck tires, but
I kind of liked them. I thought I might replace them later with more realistic
aircraft-type tires, but for now, they work OK.)
Many of my friends heard about the new arrival on the airport, and
encouraged me to restore the airplane to airworthy condition, thinking it
would be as simple as "putting an engine in it" and launching into the wild
blue. Usually, after I finished laughing, I would simply show them a few
examples of the horrendously non-airworthy workmanship that had gone into
this airframe, and they understood why this BD-5 was
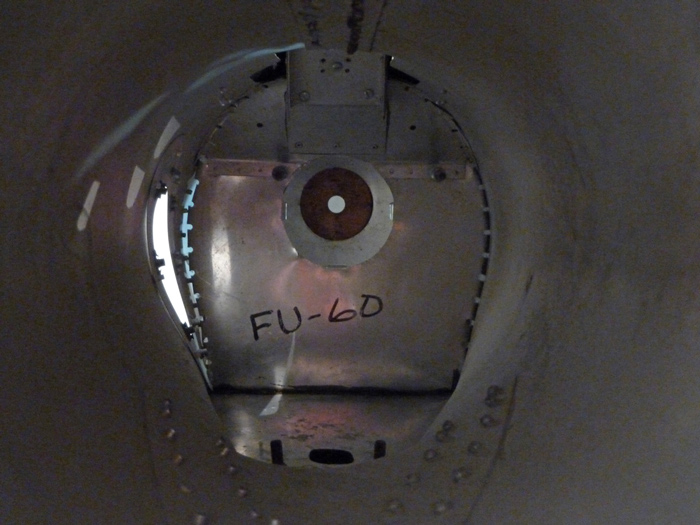
never going to be a candidate for restoration to flight. Here, you can see a line of
blind rivets on the left side that was supposed to attach the skin to the
bulkhead, but never made it all the way through the bulkhead:
There were many, many other examples of the haste with which this poor BD-5
had been slapped together, using non-standard hardware and iffy construction
practices.
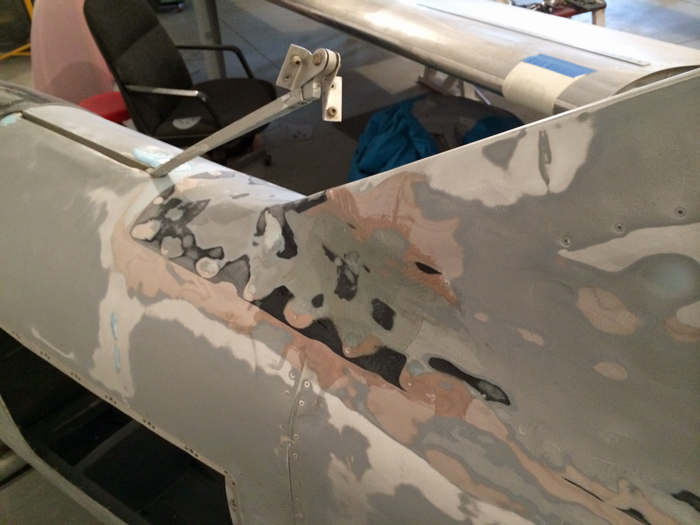
The first significant repair I had to do was aft of the cockpit, where the
canopy and its support rod had repeatedly smacked the vertical stabilizer
and the fuselage skin.
It had also knocked some holes in the VS-to-fuselage fairing.
As I began to remove the paint in this area, I found lots of pre-existing,
crudely-sanded body
filler:
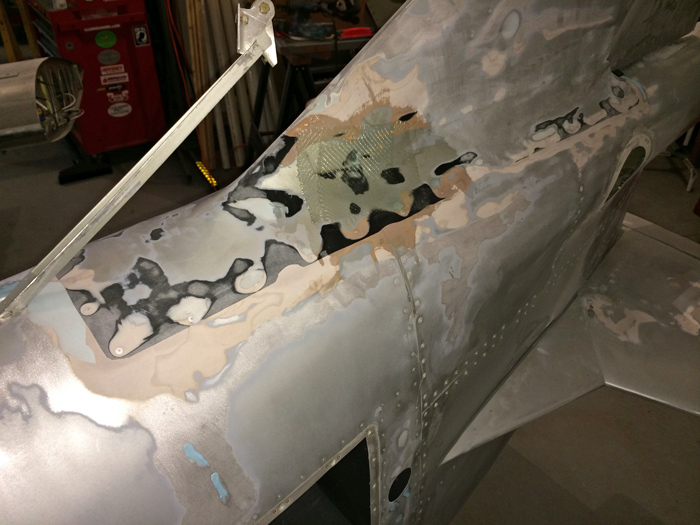
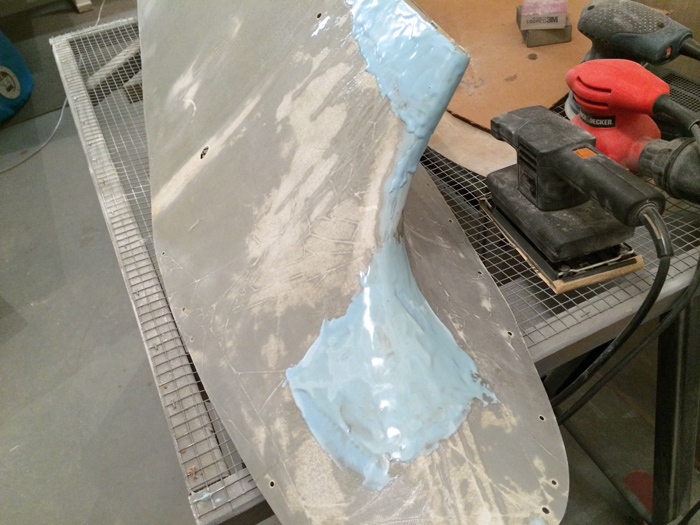
I patched the holes in the fairing with lightweight
fiberglass cloth and resin. You can also see that I'd begun to patch some of the dings
in the skin with SuperFil filler (the blue stuff in the following photos). I
filled and sanded this whole area for several days to get it smoothed out.
It was pretty wavy and ugly to start with:
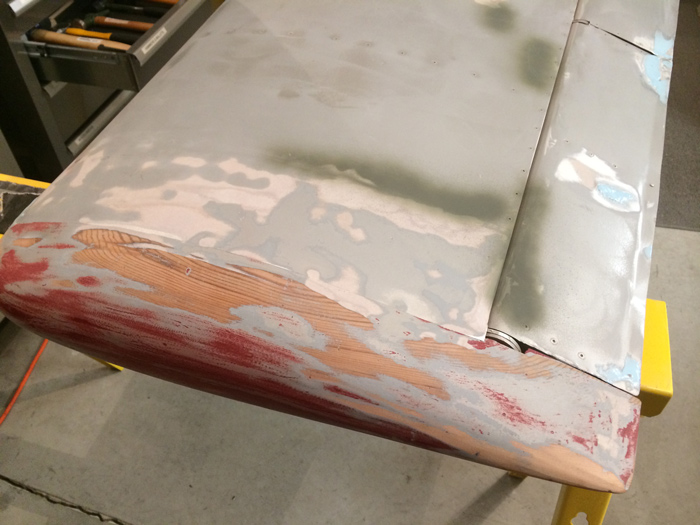
Surprise, surprise! Under the paint, I found
wood in several places. The wingtips and the tip fairings on the
vertical stabilizer, rudder, and stabilator were made of wood that had been
carefully sanded to match the airfoils' contours. I was actually pretty
impressed with the craftsmanship of these tips, so I left them in place.
They just needed some filler to make them perfectly smooth and pinhole-free:
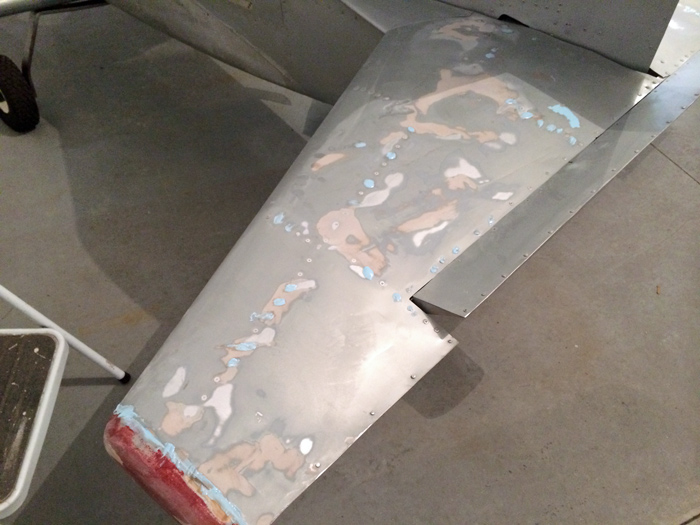
Another structural problem appeared when I got to the all-moving horizontal
stabilizer. It was moving all right -- in fact, it was almost floppy.
You could grab the end of the stabilator and move it up and down 6 inches. The
structure had very little stiffness to it. I began stripping the paint
off, and found that there were no rivets in the skin in the outer two "bays"
along the spar. I shoved a 3-foot long borescope camera inside the stab, and
found there was NO spar in those outer bays! Someone had just filled the
empty skin holes with body filler and pressed on with their paint job. The skin certainly
provided enough stiffness to look good enough for a parade float, but it
made the tail section a bit delicate. How the spar came to be truncated
like this will remain a mystery. I thought about disassembling the whole
stab and fabricating a new spar, riveting it back in, and re-skinning the
whole thing -- but frankly, I wanted to get this entire project done within a month
or two and a budget of perhaps $2,000, and I was already past both my time and expense
estimates. I decided to leave it alone.
Presto -- a couple of nice little cover plates, and there were no more exhaust pipe
holes:
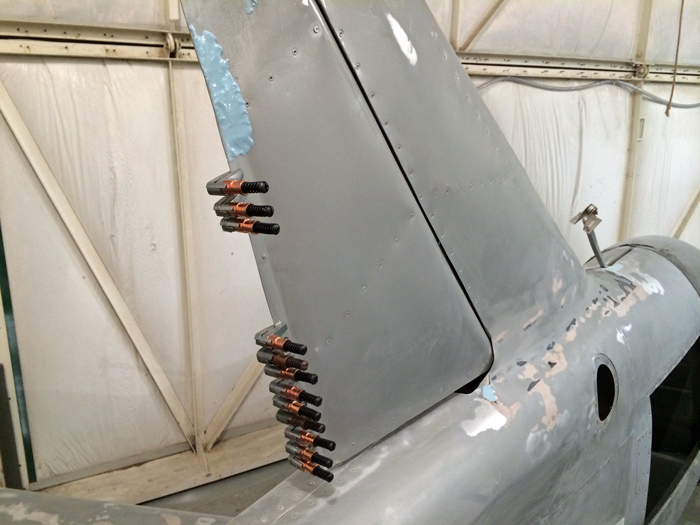
Straightening out and re-bonding the trailing edge of the
rudder took every side-grip cleco I had:
The wing-root fairings were very crudely-built, and were in poor condition. I spent many hours
filling, patching, sanding, and reshaping them to be acceptable for even a
static-display airplane. They're still not great, but from a few feet away,
you can't really tell. (Shhh...it's our secret.)
During the body-work phase, I'd been contemplating how I wanted to
display this airplane. It had super-short "A"-wings, so it wouldn't look
quite right as a BD-5B or BD-5D. And what to do about the missing propeller?
Hmmm. The gaping hole at the back end of the airplane began to gave me an idea:
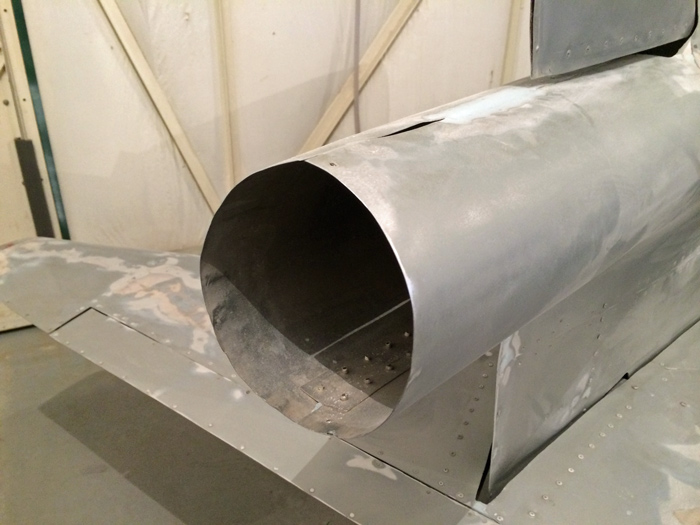
"It kind of looks like a jet nozzle... Hey, that's it! Let's make this thing
a -J model!"
In a flash, I had the whole thing planned out. I would paint
the airplane as a tribute to Corkey Fornof and Bob Bishop, whose "Sonic Acrojets"
formation team was one of the formative airshow acts of my teenage years:
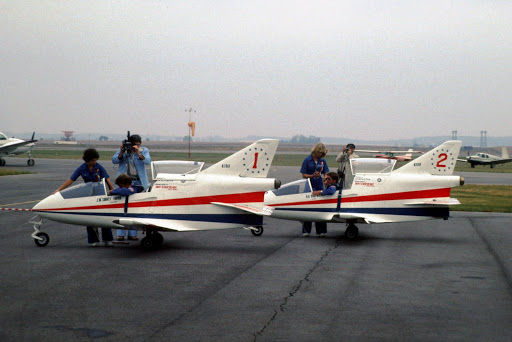
The Acrojets, circa 1977.
Photo courtesy Jerome Dawson. [Source]
I took some measurements and made some sketches, and took the drawings down
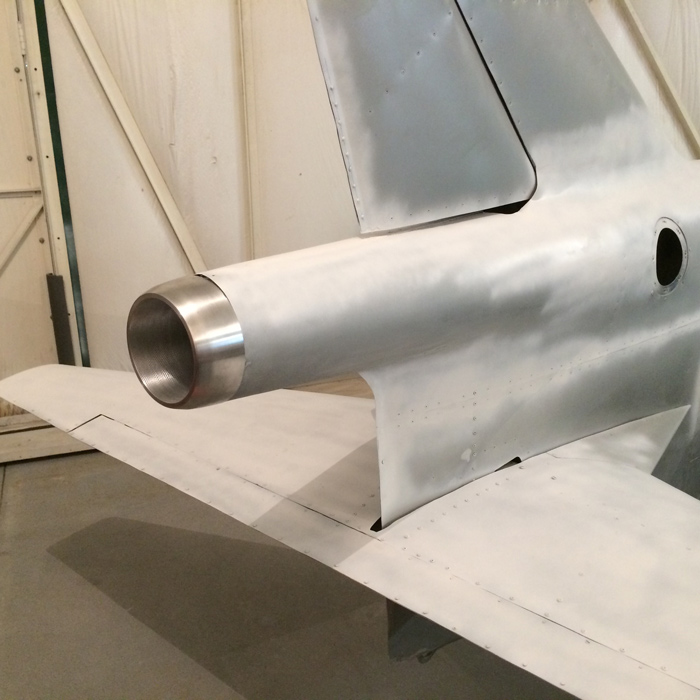
to a local machining company. Two weeks later, they handed me this:
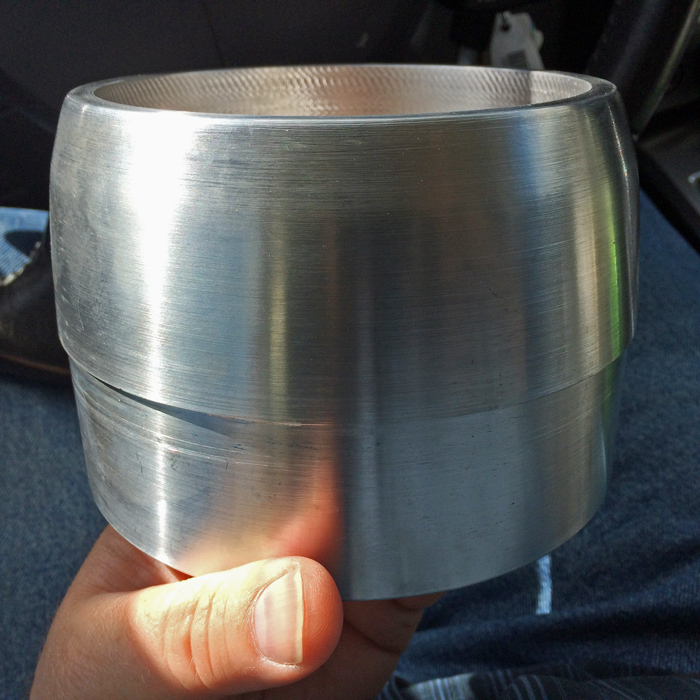
The billet aluminum exhaust nozzle looked great! I marked it, drilled it to the fuselage, and put it aside for
later assembly after the
painting process. So now I had an exhaust -- but I needed intakes. In a
real BD-5J, the intakes are located just below the aft edge of the canopy --
pretty far forward along the sides of the fuselage. I realized that
installing a pair of NACA intake scoops at that location in this airframe
would be a very time-consuming project. So I took the lazy man's way out and
decided to install them in the engine access doors, about 14" aft of their
proper location. (Hey, the BD-5 is an experimental airplane, right? A
builder is allowed to modify things...) I purchased a set of nice carbon
fiber NACA scoops from an online automotive supply catalog. These components
turned out to be the single most expensive part of this project. You don't
want to know how much I paid for those suckers. I cut the inlet holes and
flush-riveted the scoops. They looked pretty good, if I do say so myself. Here
they are, being prepped for priming:
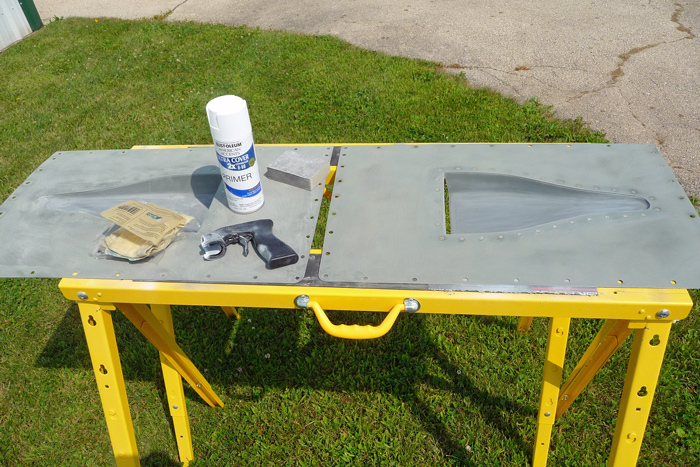
After monkeying around with the center canopy support arm for
a few days, I pronounced it un-repairable. I built my own replacement from
scratch, using my original set of BD-5 plans as a reference. Who knew I'd
ever have a chance to use them for something like this? It was a very fun
and nostalgic experience.
After removing the instrument panel and seats, I gave the fuselage and wings
a final sanding and cleanup, then primed the exterior with white rattle-can
primer. I also painted the cockpit and detailed the side control quadrants.
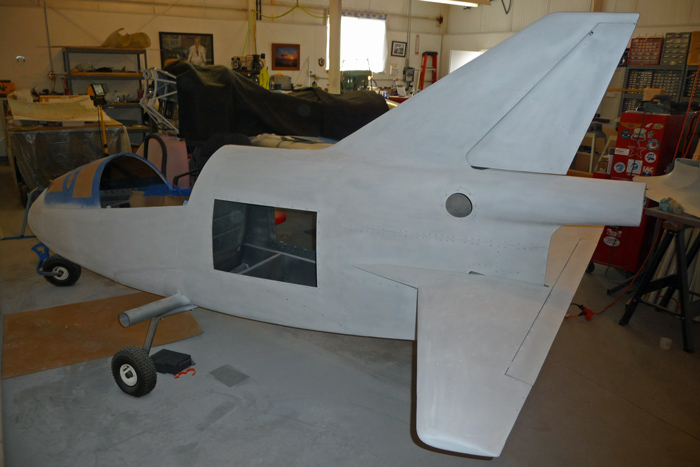
Just for fun, I test-fit the jet nozzle. (Yeah, it
doesn't have the proper BD-5J reverser buckets on it, but I think it looks
pretty good anyway. It will do nicely for its purpose...)
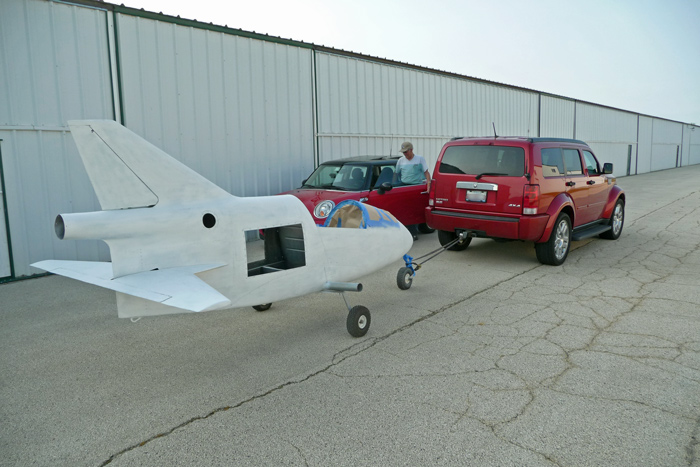
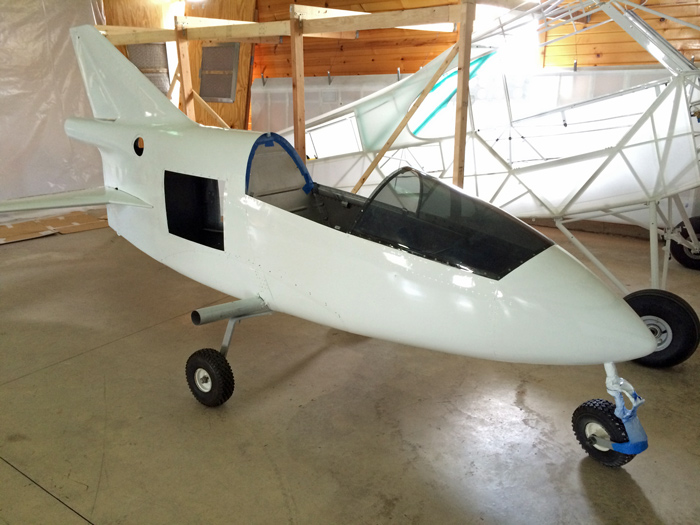
Next, we towed the plane down to my friend Bill's hangar, where the painting
would be done:
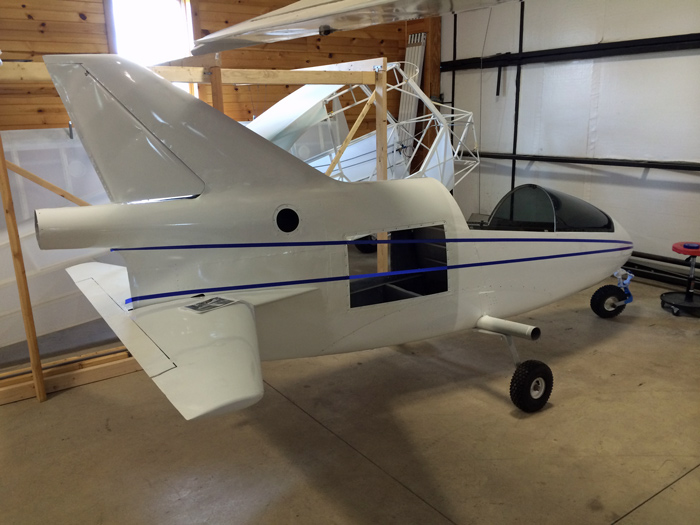
Over the next week, my good buddy Bill spent his afternoons spraying the
paint. His help and expertise were absolutely critical, since it's well
known that I absolutely HATE painting airplanes. Here, the white base coat has been
applied:
One part of the painting process I actually enjoy is tape masking, so I took
care of that myself:
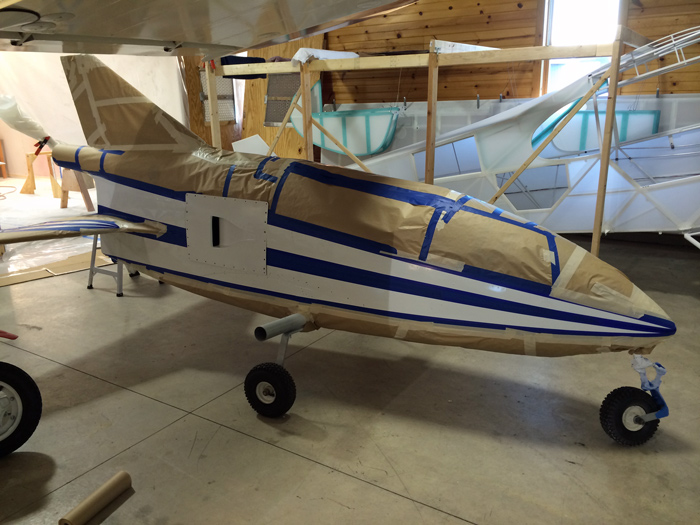
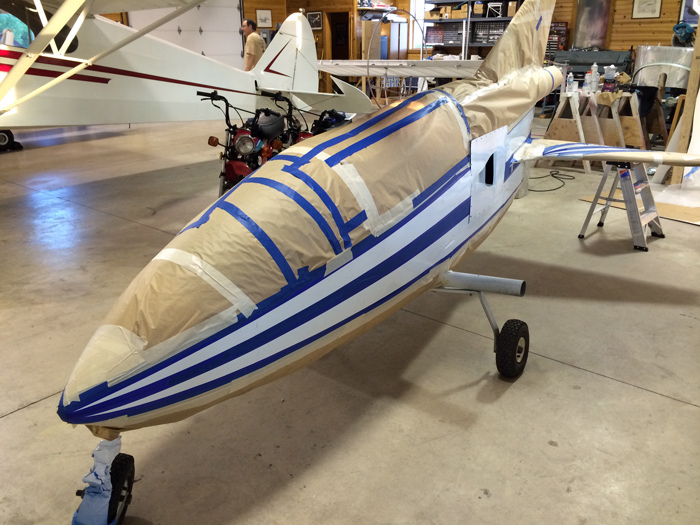
While Bill painted, I worked on the instrument panel, seat,
and canopy. On the panel, I cleaned up everything, painted the glareshield
and installed a new edging strip, and labeled some of the controls and
switches.
The seat, which consisted of two pieces of fabric-and-foam covered plywood,
was a rotting, mildew-ridden mess. The existing seat-back was also,
inexplicably, too tall -- and when
it was in place, the aft canopy attach point actually rested firmly on it
(which might have caused the canopy to break in the first place).
So I made new plywood seat parts and re-upholstered both of them with new
foam and new fabric. I also bought a scrap piece of new carpet and trimmed
it to fit, using the nasty old carpet as a template.
I also spent quite a bit of time repairing the cracked and broken canopy.
Basically, I made a curved, 4"x6" plate out of 0.032" aluminum, painted it
flat-black, and then bonded it onto the outside of the canopy, at the aft
edge. Then I
drilled the canopy rod attach point to this plate, and used new hardware to
attach it. So the plate not only
serves as the attachment point for the aft canopy support rod, but it hides
the cracks and small holes in the canopy. Because the
canopy is darkly tinted, you can hardly see the plate. And if you do see it, it looks like
it's supposed to be there.
* * * * *
A few days later, Bill said the paint job was finished! I
headed over to his hangar and marveled at the awesome job he did. I towed
the plane home and installed the engine access doors (using new stainless
screws and finish washers), attached the exhaust nozzle, and installed the instrument panel and
seat. I also painted the landing gear and wheels, and added a few details
such as an "Experimental" decal inside the cockpit.
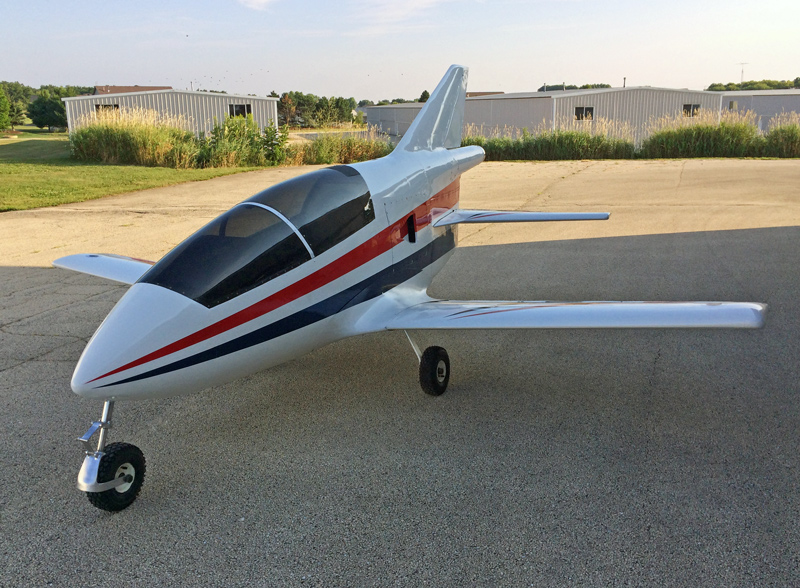
So, without further ado, let's here's my new "faux BD-5J"
display plane:
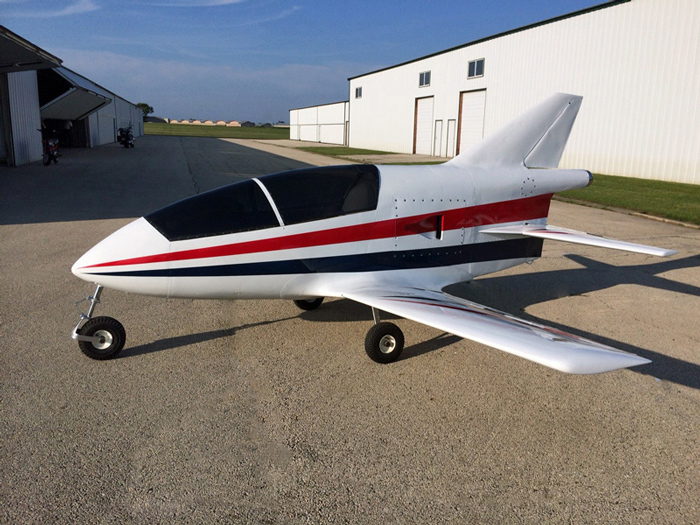
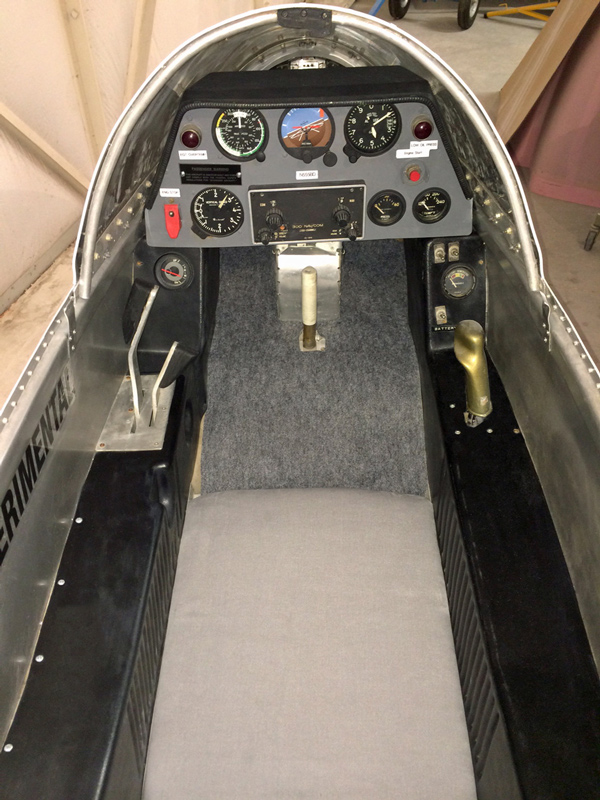
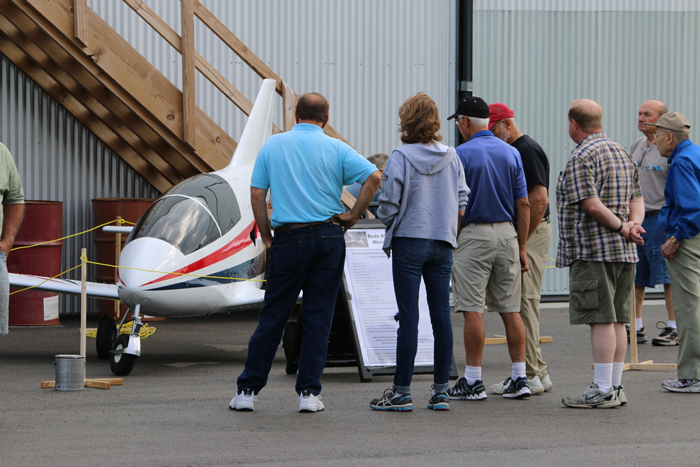
We towed her over to the local EAA hangar, and she made her public
debut in August 2014 at one of the Chapter's pancake breakfasts. I was
happy to see the overwhelmingly positive reaction from local residents and
airport bums alike. (Note the nearby signs that explain the history of the
BD-5, and how this particular one was restored for display. I think it's
important to have good, informative signage next to airplanes that are
displayed to the non-flying public.)
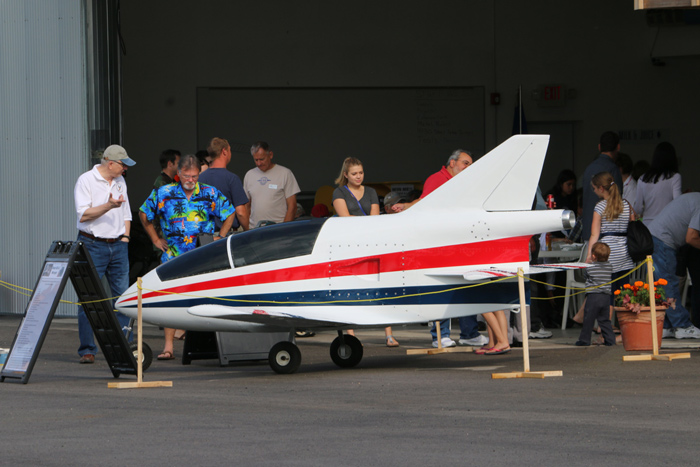
The "BD-5J" has now been on display at many of our EAA Chapter's
monthly pancake breakfasts since August 2014, as well as the chapter's
membership meetings. I always encourage kids to have their photo taken with
it and, if the child is small, I will lift them inside for a cockpit photo,
too! The kids really love the BD-5, because it's just their size.
No, mine is not a perfect BD-5J display. It's more of an artistic
interpretation of a BD-5J. But I hope I've given you some ideas for a
simple static-display airplane that you could create on a limited budget, in
order to motivate kids toward aviation. There are quite a few derelict and
forgotten old homebuilt airplanes out there. Frankly, if a homebuilt was
built in the 1960s or early 1970s, its useful life might very well be coming
to an end, and its original owner/builder is probably nearing the end of
their flying career. So keep your eyes and ears open for opportunities like
this. And it certainly doesn't have to be a BD-5.
You never know what seeds you are planting in a kid's mind. Someday, that
kid might grow up to be a pilot, mechanic, aircraft builder, ATC controller,
flight school owner, instructor, aerobatic competitor, airshow enthusiast,
photographer, artist, writer, astronaut.... You just never know. I had no
idea when I sat in that airplane in the museum many years ago where that
road would take me. Pay it forward!
--Buck Wyndham
* * * * *
Postscript: I have made a few additions to the
airplane since I finished it.
1. Applied arrow decals saying "Danger -- Jet Blast" just in front of the exhaust
nozzle.
2. Painted simulated fuel caps on the tops of the wings and applied "Jet Fuel Only"
decal rings around them. You can just barely see them in the photo above.
3. Installed aluminum ducts inside the inlets and exhaust that give the
illusion that you are looking into an intake plenum or into the jet engine.
--Buck Wyndham is Editor-In-Chief of
WarbirdAlley.com. He is a professional pilot, photographer, author, and
historian.
